NEVISCOPE
User Manual
Please read these instructions before using this product
Note: This product is intended for external testing only. Do not look directly into the LED light.
| Neviscope is a certified medical device compatible with most smartphones on the market. Designed to photograph skin lesions. It has a system that allows for high magnification and clarity of images.
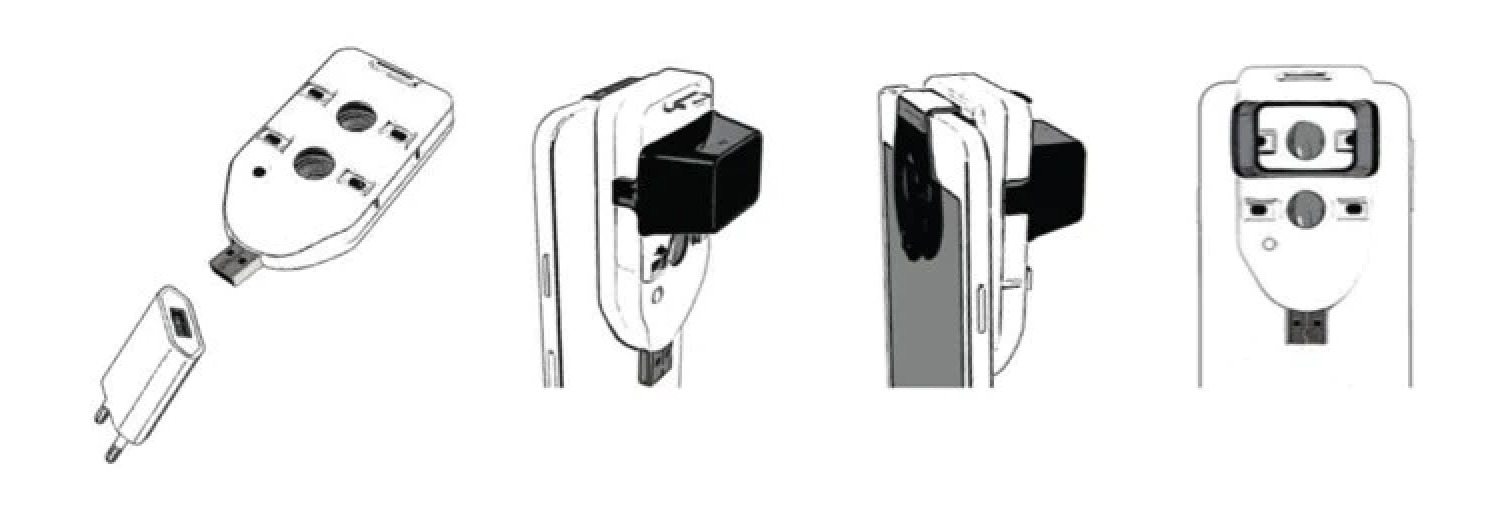
It can be attached to a smartphone using a patented mount. The best stability will be obtained by using a matte silicone case for the phone. The first charge of the dermatoscope is very important. Any cube from a phone charger is used for this – charge the dermatoscope until the blue light goes out. Charge the dermatoscope 3-4 minutes after each examination. Working in the office with patients, it is also possible to connect a USB 2.0 TYPE – A MALE TO TYPE – A FEMALE EXTENSION CABLE thanks to which the operation of the dermatoscope is carried out without charging. The white LED light automatically turns off after 1 minute to save battery life. In the inch of speeding up the examination, you can record a video and just like a photo add to a specific patient in our application .
|
1)Charge the dermatoscope about 15-20 minutes
2)Attach the holder over the lens on the phone 3)Find your phone’s camera compatible with Neviscope (the lenses fit together when you take a picture and see the overlay grooves on both sides of the phone’s display) 4)After connecting Neviscope to your smartphone, place the black cap next to the lens you are using. 5)After selecting the test site, gently moisten it and the surrounding skin, for example. disinfectant , oil. The image quality will be better. Note that when the camera touches hair instead of skin, you may need to shave the area. 6)Turn on the polarizedlight with the button below the dermatoscope lens and hold ok . 5sec. 7)Turn on the camera; zoom and focus accordingly by tapping on the center of the change on your phone’s screen; take a picture. 8)Download the free Neviscope Professional app from the App Store or Google Play and follow the instructions in the app. |
| Dear User, if you need more information, please contact our office: office@myneviskin.com Warranty length: 2 years.
NEVISCOPE is a registered trademark. All rights reserved. Neviscope Dermatoscope Type: Deviscope NV 007 complies with the essential requirements of the New MDR EU Directive Regulation 2017/745. GMDN :18021 Dermatoscopes, Classification : Class1, |
|
The mount needs to be attached over the smartphone camera,and then the Neviscope with the overlay is placed on the affected skin area. To attach the universal mount to your smartphone, simply place it on the back of your phone. (See figure and video). Then adjust the Neviscope lens over the camera on your phone. The easiest way to check if the phone’s camera fits the dermatoscope’s camera is when you take a picture and see the overlay grooves on both sides of the phone’s display.
In the case of several cameras – you need to find a compatible one with Neviscope, please see how to do it by going to the videos recorded on our Youtube channel .
How to take a picture
- After selecting the area to be photographed, gently dampen it and the surrounding skin with your hand with disinfectant or similar liquid, then brush the birthmark with oil or butter. This increases image quality.
- After connecting Neviscope to your smartphone, place the black cap directly on your skin and press the power button about 5 sec to turn on the lens.
- Then take a picture with your smartphone.
Before taking the picture, note that if the camera is placed on the hair instead of the skin, you may need to shave the area.
How it works
Instructions for charging the dermatoscope via USB and in the second video the first insertion of the dermatoscope
Instructions for setting up Neviscope dermatoscope on smartphones :
Iphone 14
Samsung S21
Samsung S22
Iphone SE
Iphone 12
Phone case for better examination comfort
- CHARGING LIGHTS
Works with the standard USB port of any phone charger cube - MONTAGE
Attach the mount to the phone and launch. - CALL
Connect your device to your smartphone and turn on the light - FREE Neviscope Professional app to download for Android and iOS
Download the free app from the App Store or Google Play follow the instructions in the app.

